Taking off acrylic nails might seem intimidating, but with the right tools and methods, it’s a manageable task. Acrylic nails are a go-to option for those seeking long-lasting and robust nails. However, they eventually need removal. Acetone-based nail polish remover is one of the most trusted methods for removing acrylics. This comprehensive guide will walk you through each step to ensure you achieve professional results while protecting your natural nails.
Acrylic nails have become a cornerstone in the beauty industry, offering a polished and durable appearance that lasts for weeks. However, improper removal can lead to damage, so understanding the correct technique is crucial. This article provides a detailed breakdown of the process, empowering you to confidently remove acrylics at home and keep your nails healthy.
This guide is designed to provide you with all the essential information you need to safely and efficiently remove acrylic nails using acetone. Whether you’re a beginner or experienced, there are always new strategies to enhance your nail care routine. Let’s get started!
Read also:Austin Botanical Gardens A Natural Escape In The Heart Of Texas
Content Overview
- Understanding Acrylic Nails
- Why Acetone Is Effective for Removal
- Tools You'll Need for Removal
- Step-by-Step Removal Process
- Common Mistakes to Avoid
- Alternatives to Acetone
- Post-Removal Nail Care Tips
- Frequently Asked Questions
- Reasons to Remove Acrylic Nails
- Conclusion and Resources
Understanding Acrylic Nails
Acrylic nails are artificial enhancements created by mixing liquid monomer and powder polymer, forming a strong, durable surface. They are favored for their ability to protect natural nails from breakage and provide a polished appearance. While acrylics offer numerous benefits, they require proper removal to prevent damage to the natural nail bed.
Why Acrylic Removal Is Necessary
Over time, acrylic nails may loosen, chip, or lift from the nail bed, affecting their appearance and increasing the risk of infection. Bacteria trapped beneath the acrylic layer can cause health issues. Proper removal is essential to maintain nail health and prevent complications.
Why Acetone Is Effective for Removal
Acetone is a potent solvent that efficiently breaks down the adhesive properties of acrylic nails. Widely used in salons and at-home removal processes, acetone dissolves the bond between acrylic and natural nails, making it easier to remove the artificial layer. Its effectiveness, availability, and affordability make it a popular choice for nail removal.
Advantages of Using Acetone
- Highly effective at breaking down acrylic bonds
- Easily accessible in drugstores and beauty supply stores
- Affordable compared to salon services
- Works for both gel and acrylic nail removal
Tools You'll Need for Removal
To ensure a seamless removal process, gather all necessary tools beforehand. Having the right equipment will make the process faster and more efficient. Here’s what you’ll need:
- Acetone-based nail polish remover
- Cotton balls or pads
- Aluminum foil or cotton wraps
- Nail file or buffer
- Cuticle pusher or orange stick
- Cuticle oil or moisturizer
Where to Find Acetone
Acetone is available at most drugstores, beauty supply stores, and online retailers. Opt for high-quality acetone free from additives to prevent skin and nail irritation. Popular brands include OPI, Sally Hansen, and Revlon.
Step-by-Step Removal Process
With all your tools ready, follow these steps to safely remove acrylic nails using acetone:
Read also:Jimmy Fallon Birthday Celebrating The Life And Career Of A Latenight Legend
Step 1: Prepare Your Workspace
Ensure your workspace is clean and well-ventilated, as acetone has a strong odor. Place all your tools within easy reach to avoid interruptions during the process.
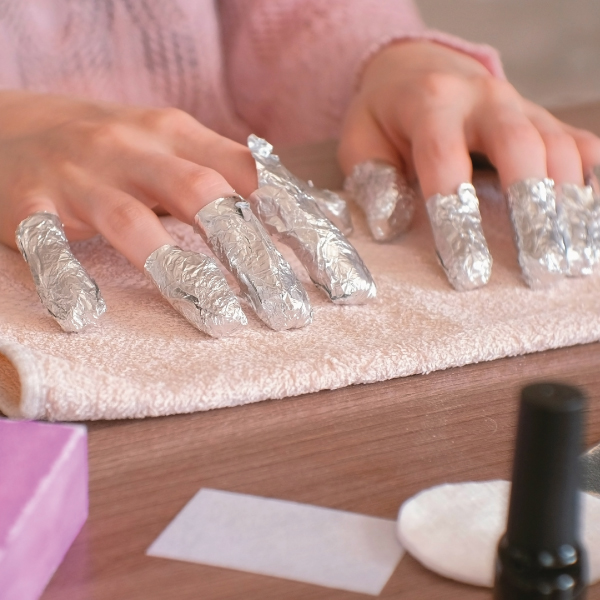
Step 2: Soak the Acrylic
Saturate a cotton ball with acetone and place it on each nail. Wrap each nail with aluminum foil or a cotton wrap to keep the cotton ball in place. Allow it to sit for approximately 10-15 minutes to soften the acrylic.
Step 3: Gently Lift the Acrylic
After the acrylic has softened, use a cuticle pusher or orange stick to gently lift and scrape it off. Be cautious not to apply excessive pressure, as this can harm your natural nails.
Step 4: Smooth Remaining Acrylic
If any acrylic residue remains, use a nail file or buffer to smooth it out. Always file in one direction to avoid weakening the natural nail structure.
Step 5: Hydrate Your Nails
Once all the acrylic is removed, apply cuticle oil or moisturizer to hydrate your nails and cuticles. This step is vital for maintaining healthy nails after removal.
Common Mistakes to Avoid
While removing acrylics with acetone is relatively simple, there are common errors to avoid:
- Using acetone-free nail polish remover, which is ineffective for acrylic removal
- Forgetting to ventilate your workspace, leading to acetone inhalation
- Applying too much pressure when scraping off acrylic, which can damage the nail bed
- Not moisturizing after removal, leaving nails and cuticles dry and brittle
Alternatives to Acetone
Although acetone is the most effective solvent for acrylic nail removal, some prefer alternatives due to its strong smell or potential skin irritation. Consider these options:
Acetone-Free Nail Polish Remover
While not as effective as acetone, acetone-free nail polish remover can soften acrylics over time. However, it may require multiple sessions and more effort to achieve the desired results.
Warm Water Soaking
Soaking your nails in warm water for an extended period can help loosen the acrylic bond. Although less harsh, this method takes longer and may not work well for thicker acrylics.
Post-Removal Nail Care Tips
After removing acrylic nails, it’s crucial to care for your natural nails to ensure they remain strong and healthy. Follow these tips:
- Apply cuticle oil or moisturizer daily to keep nails hydrated
- Avoid biting or picking at your nails
- Adopt a balanced diet rich in vitamins and minerals to support nail growth
- Consider taking biotin supplements to promote stronger nails
Frequently Asked Questions
How Long Does Acrylic Removal Take with Acetone?
On average, removing acrylic nails with acetone takes about 20-30 minutes. The exact time may vary depending on the acrylic thickness and your technique.
Is It Possible to Remove Acrylics Without Acetone?
Yes, but it may require more time and effort. Alternatives include soaking your nails in warm water or using acetone-free nail polish remover.
Reasons to Remove Acrylic Nails
Removing acrylic nails offers numerous benefits, including:
- Allowing your natural nails to recover and breathe
- Reducing the risk of infections and damage
- Giving your nails a break from artificial enhancements
- Promoting healthier nail growth
Conclusion and Resources
Removing acrylic nails with acetone is a straightforward and effective process that can be safely done at home. By following the steps outlined in this guide, you can ensure a smooth removal without compromising the health of your natural nails. Remember to care for your nails post-removal to maintain their strength and appearance.
We encourage you to share this article with friends or family who may find it helpful. If you have any questions or additional tips, feel free to leave a comment below. For more beauty tips and nail care advice, explore our other articles on the site!
Data sources: Mayo Clinic, WebMD, Healthline.